Last updated: June 26, 2024
Set up data grouping
Read this guide to learn how to configure data grouping in DQOps for running data quality checks for different data streams.
What is data grouping in DQOps?
Data group is a group of rows that were loaded from a single or different sources and aggregated into one table.
In DQOps, data grouping in a single table can be identified by a discriminator column containing data such as location, business units, vendor, data provider or subsidiary. Data from separate tables can also be aggregated into single data group by adding a tag with the name of the data source.
Data groups are used to calculate separate data quality KPI scores for different groups of rows.
For more information about data grouping, see data grouping in the DQOps concepts section.
In DQOps, you can set up data grouping globally at the data source level, in which case the configuration will be copied to the data grouping configuration of the tables that will be imported. Note that this configuration does not affect tables that have already been imported.
The data grouping should be configured individually for each table, which allows to select columns from the monitored table that will be used in the GROUP BY clause to identify each group of data coming from a different data source.
Set up data grouping using the user interface
Set up the default data grouping for a data source
To set up the default data grouping configuration template at the data source level, follow the steps below.
Data grouping configuration on data sources is effective only for new tables
The default data grouping configuration added at the data source level will be copied to the data grouping configuration of all the tables that will be imported in the future. Note that this configuration does not affect tables that have already been imported, or tables were registered manually by adding .dqotable.yaml files.
-
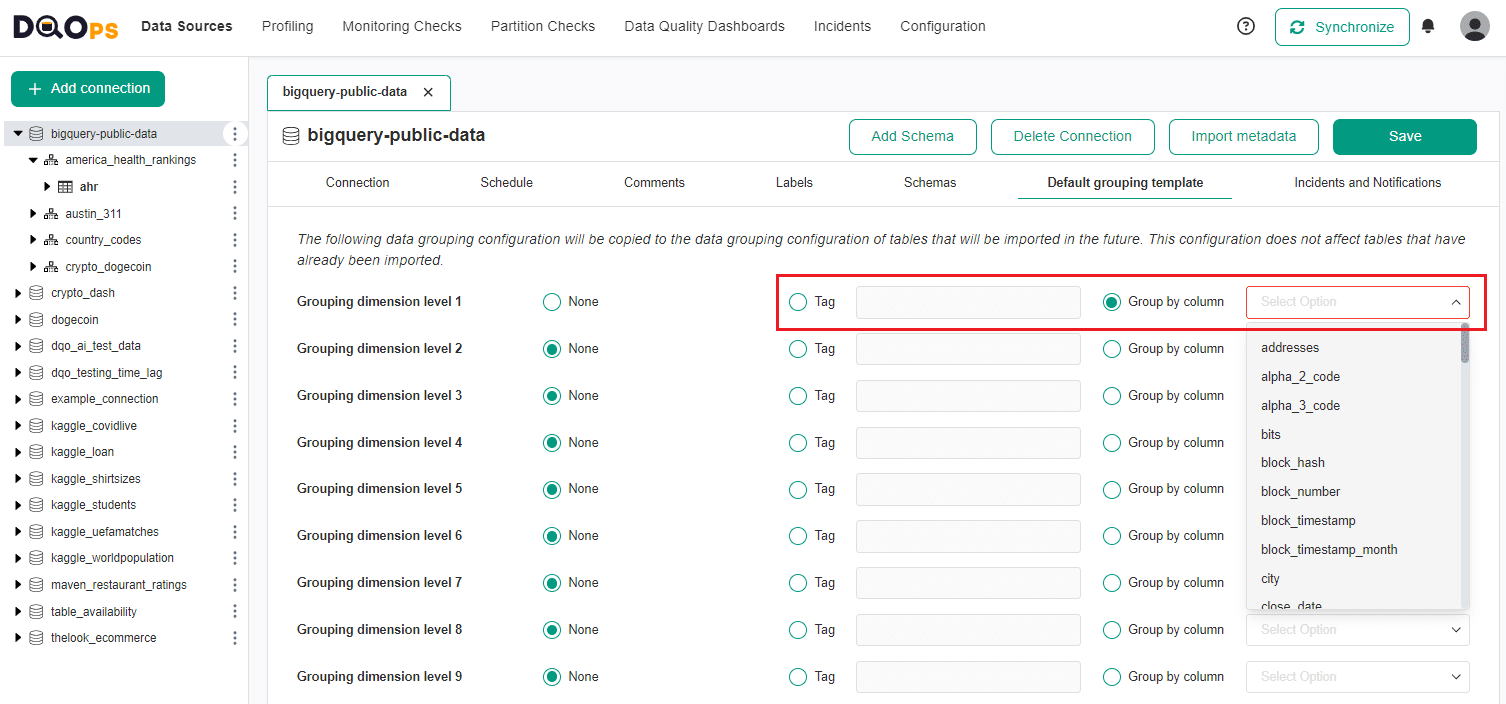
In the DQOps user interface, go to the Data Source section, select the data source of interest in the tree view on the left, and select the Default grouping template tab.

-
In the Default grouping template tab, write a tag for a data source or select the discriminator column from the dropdown that would identify the data source. You can configure up to 9 different data grouping dimension levels.
-
Once you have set the data grouping configuration, click on the Save button to save your changes.
Set up data grouping at the table level
To set up data grouping configuration at the table level:
-
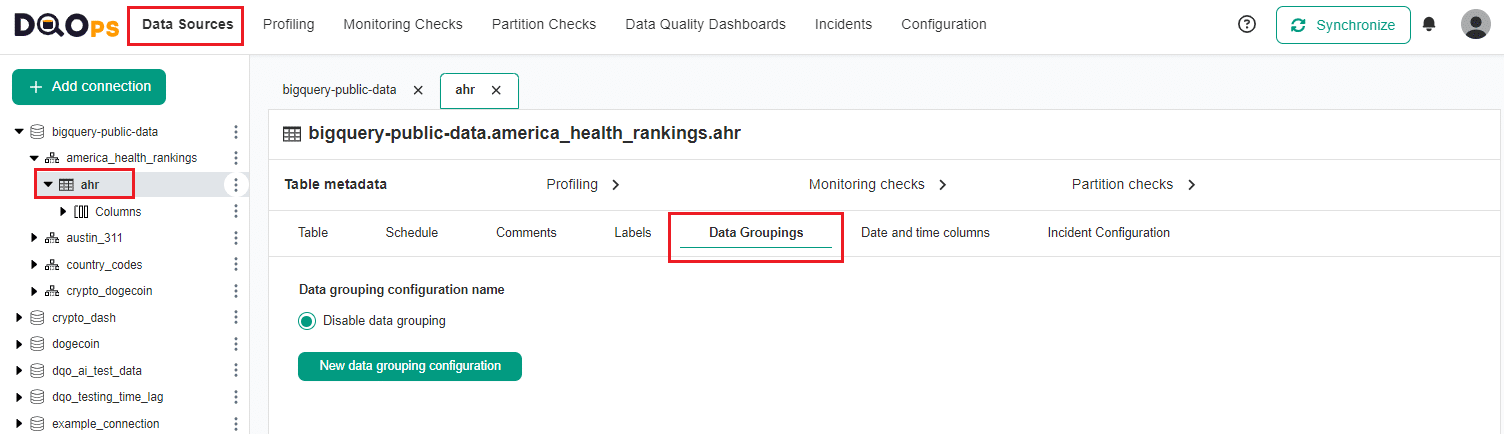
In the DQOps user interface, go to the Data Source section, select the table of interest in the tree view on the left, and select the Data Grouping tab.
-
Click on the New data grouping configuration button.
-
Write a Data grouping configuration name and write a tag for a data grouping or select the discriminator column that would identify the data source.

-
Once you have set the data grouping configuration, click on the Save button to save your changes.
Switching the active data grouping configuration
The table registered in DQOps has multiple configurations of data groupings. To make a data grouping configuration active, use the radiobutton to switch to the configuration that was created in the previous step.
You will get a warning window when you select a new data grouping. Data grouping is an advanced functionality of DQOps that requires planning. DQOps will add a GROUP BY clause to every data quality check query, generating a lot of data quality results. The number of rows returned by a GROUP BY clause in SQL will increase the number of data quality check results tracked by DQOps and will impact data quality KPIs.
For more information about data grouping, see data grouping in the DQOps concepts section.

On this screen you can also edit or delete data grouping configurations using Action buttons.
Set up data grouping configuration using the DQOps Shell
For the purpose of this section, we will show how to edit a .dqotable.yaml file directly from the DQOps command-line shell by opening Visual Studio Code as an editor.
In order to fully take advantage of code completion for DQOps YAML files, please follow the Visual Studio Code configuration guide to learn how to install required extensions.
Set up data grouping at the data source level
To set up a default data grouping configuration at the data source level, follow the steps below. This default setting is not used on tables on the data source. DQOps uses this configuration only once, when the table metadata is imported to DQOps user home. The connection-level data grouping configuration is copied to the .dqotable.yaml file.
-
Run the following command in DQOps Shell to edit YAML configuration file and define the default data grouping.
-
Provide the connection name.
After providing the above data Visual Studio Code will be automatically launched.
-
Add the default data grouping configuration to the YAML file using Visual Studio Code editor and save the file.
- Add the
default_grouping_configuration:parameter. - Add the level of the data groupings (dimensions) such as
level_1:, and specify thesource:astagorcolumn_value - Add a name for the
tag:orcolumn:parameters.
Below are examples of the YAML files showing a sample configuration of a default data grouping configuration with a tag or column.
- Add the
apiVersion: dqo/v1
kind: source
spec:
  provider_type: bigquery
  bigquery:
    source_project_id: bigquery-public-data
    authentication_mode: google_application_credentials
  default_grouping_configuration:
    level_1:
      source: tag
      tag: tag1
  incident_grouping:
    grouping_level: table_dimension_category
    minimum_severity: warning
    max_incident_length_days: 60
    mute_for_days: 60
apiVersion: dqo/v1
kind: source
spec:
  provider_type: bigquery
  bigquery:
    source_project_id: bigquery-public-data
    authentication_mode: google_application_credentials
  default_grouping_configuration:
    level_1:
      source: column_value
      column: country
  incident_grouping:
    grouping_level: table_dimension_category
    minimum_severity: warning
    max_incident_length_days: 60
    mute_for_days: 60
Set up data grouping at the table level
To set up a data grouping configuration at the table level
-
Run the following command in DQOps Shell to edit YAML configuration file and define the data grouping configuration.
-
Provide the connection name and full table name in a schema.table format.
After entering the above data, Visual Studio Code will be automatically launched.
-
Add the data grouping configuration to the YAML file using Visual Studio Code editor and save the file.
- Add the
groupings:parameter above thecolumn:section. - Add a name of the data grouping configuration
- Add the level of the data grouping (dimension) such as
level_1:, and specify thesource:astagorcolumn_value - Add a name for the
tag:orcolumn:parameters.
Below is an examples of the YAML files showing a sample configuration of 2 data grouping configurations:
- "group_by_country" with data grouping set on category column
- "group_by_area" with data grouping by assigning a tag
landing_zoneto all data quality results.
apiVersion: dqo/v1 kind: table spec: incremental_time_window: daily_partitioning_recent_days: 7 monthly_partitioning_recent_months: 1 default_grouping_name: group_by_country groupings: group_by_country: level_1: source: column_value column: country_name group_by_area: level_1: source: tag tag: landing_zone columns: unique_key: type_snapshot: column_type: INT64 nullable: true country_name: type_snapshot: column_type: STRING nullable: true - Add the
What's more
- Read the concept of running data quality checks with data grouping to understand how DQOps generates queries with a GROUP BY clause to analyze data quality for each group of rows.