Last updated: November 13, 2024
Schedules overview
Read this guide to learn how to configure the scheduling of tables import and data quality checks execution at various levels.
Overview
With DQOps, you can easily customize when checks are run by setting schedules. You can set schedules for an entire connection, table, or individual check. When you import a new table, DQOps automatically schedules profiling checks to run at 12:00 PM on the 1st of every month and daily monitoring checks at 12:00 PM. Additionally, you can customize the schedule for automatic table imports from a connection.
To modify the schedule you can use the user interface as described below or manually modify the YAML configuration file as described here.
Different types of checks, such as Profiling, Monitoring, and Partition, have their own schedules. For more information on these different check types, please refer to the DQOps Concepts section.
Default schedule configuration
DQOps automatically sets the default schedule configuration for all newly imported tables.
You can find the default schedule configuration stored in the $DQO_USER_HOME/settings/defaultschedules.dqoschedules.yaml file located in the DQOps user home.
It is important to note that DQOps does not use these schedules directly, and changing the file will not affect your data sources. The configuration file is only used to copy the default cron schedules to the data source connection file when you import the data source.
Change the default schedule configuration
To change the default schedule configuration, follow these steps:
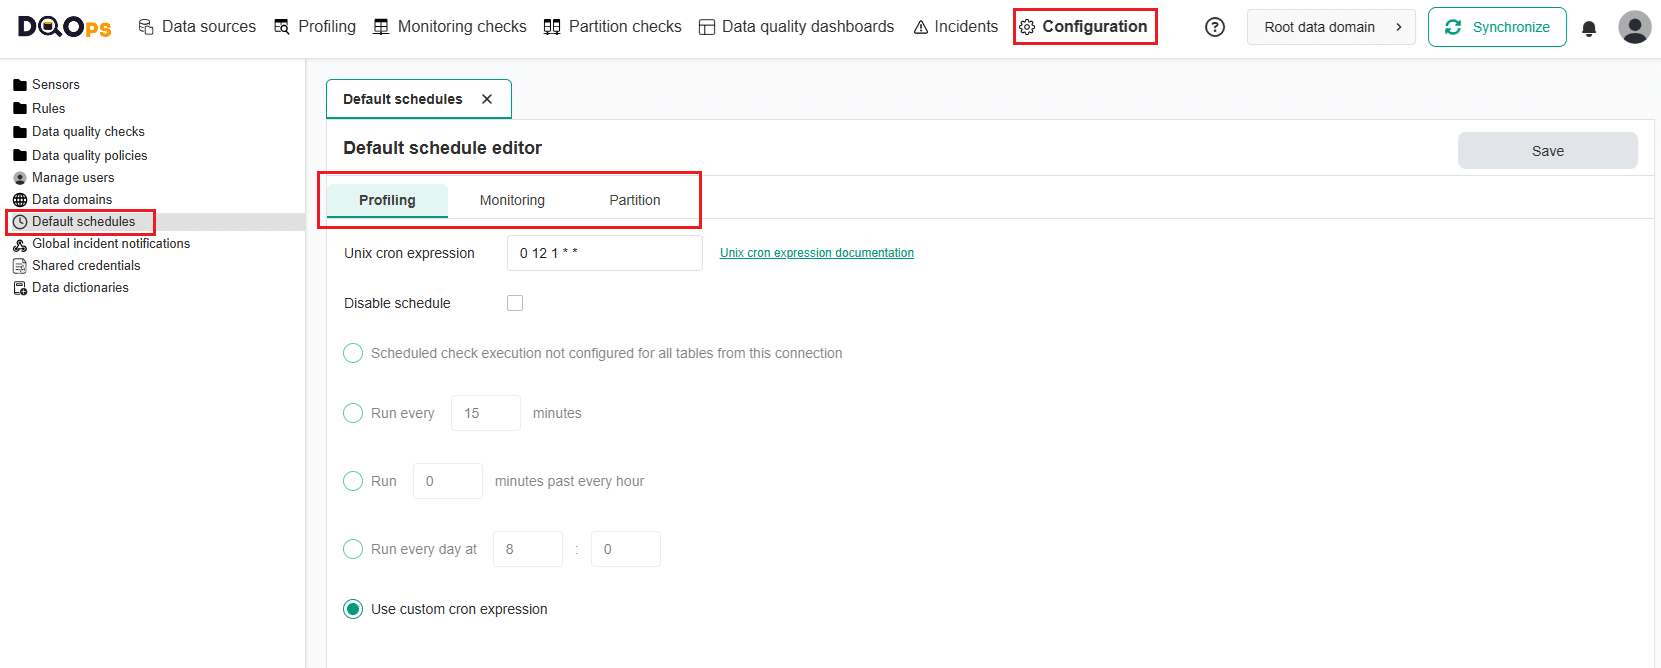
- Go to the Configuration section.
- Click on the Default schedules option in the three view on the left.
- Select the tab with the checks type you want to modify.
- Specify the schedule using a Unix cron expression or select one of the options provided.
- Click on the Save button to save your changes.
Configure a schedule at connection and table level
To set up or modify a schedule for the entire connection or table, follow these steps:
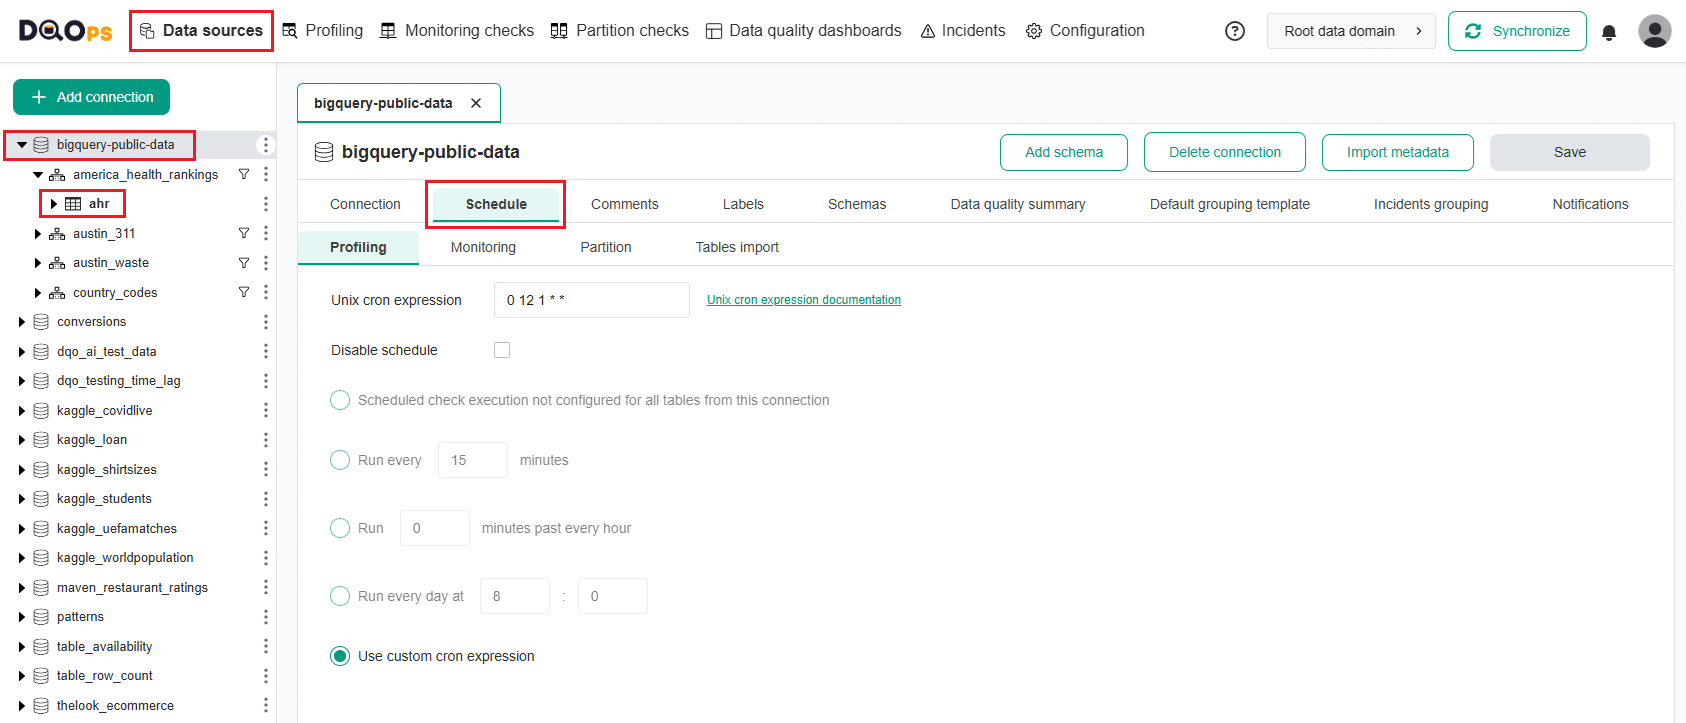
- Navigate to the Data sources section.
- Choose the connection or table where you want to set or modify the schedule from the tree view on the left.
- Click on the Schedule tab.
-
Select the check type:
- Profiling
- Monitoring (in the paid version, you can select Daily and Monthly checks)
- Partition (in the paid version, you can select Daily and Monthly partitioned checks)
-
Specify the schedule using a Unix cron expression or select one of the options provided.
- Once you have set the schedule, click on the Save button to save your changes.
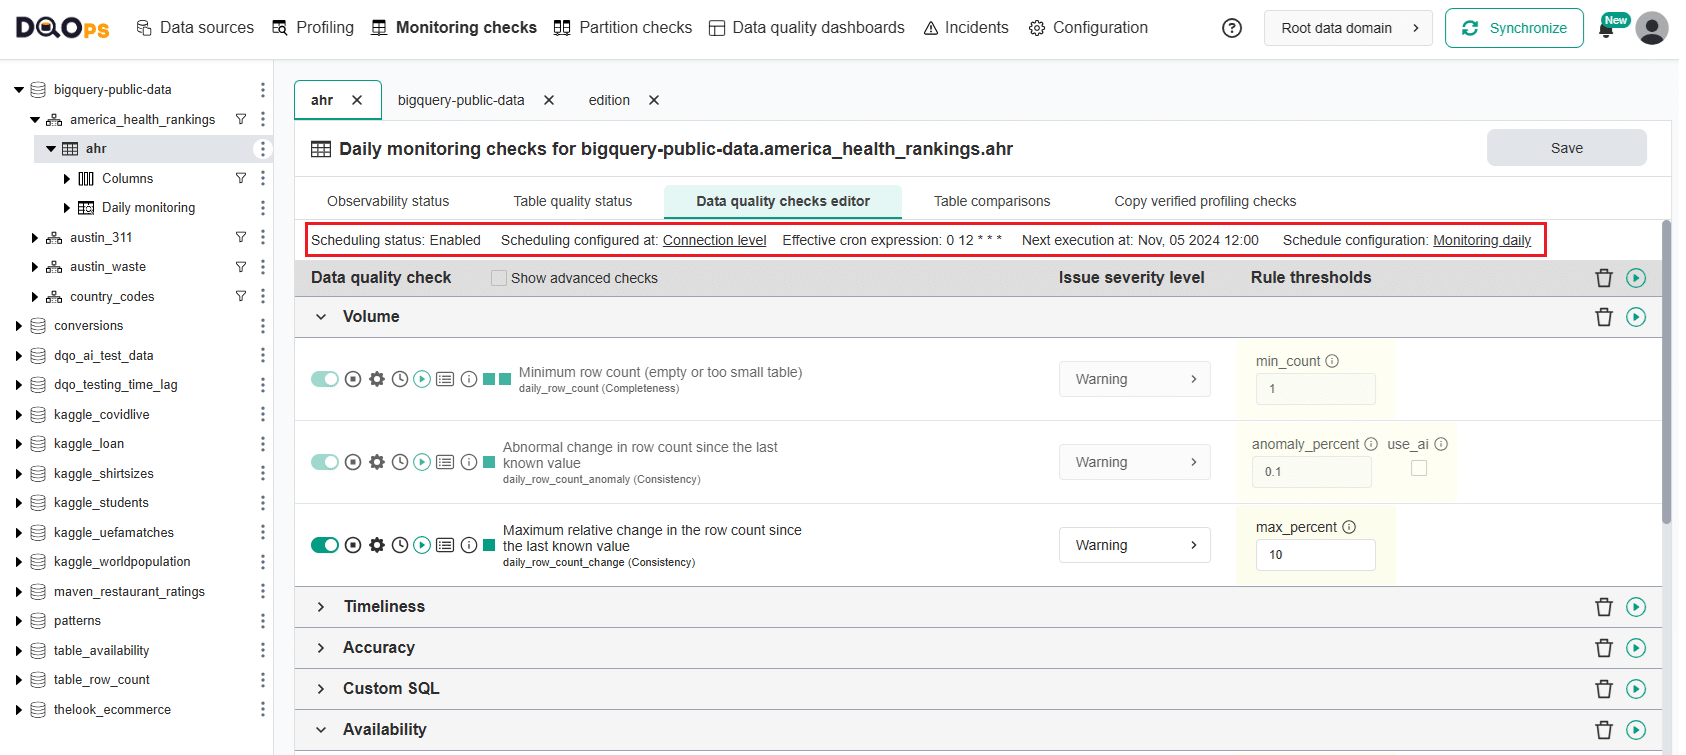
Once a schedule is set up for a particular connection, it will execute all the checks that have been configured across all tables associated with that connection. If you wish to disable the schedule for a specific table, you can simply do so by checking the "Disable schedule" checkbox.
Please note that any changes made to the schedule on the table level will override the schedule set for the entire connection.
On the Check editor screen, you can check if the schedule is enabled, where it is configured, what the effective cron expression is, and when the next check execution will take place.
Configure a schedule at check level
To set up a schedule for a specific check, follow these steps:

- Navigate to the section with a check type of interest (Profiling, Monitoring checks or Partition checks).
- Choose table or column of interest from the tree view on the left.
- Enable the check of interest then click the Setting button and go to the Schedule Override tab.
- Specify the schedule using a Unix cron expression or select one of the options provided.
- Once you have set the schedule, click the Save button to save your changes.
Please note that any changes made to the schedule at the check level will override the schedule set for the entire connection or table.
Configure schedule for automatic tables import
You can configure an automatic import schedule for tables from a connection to keep your data fresh and up-to-date.
To set up or modify a table import schedule, follow these steps:
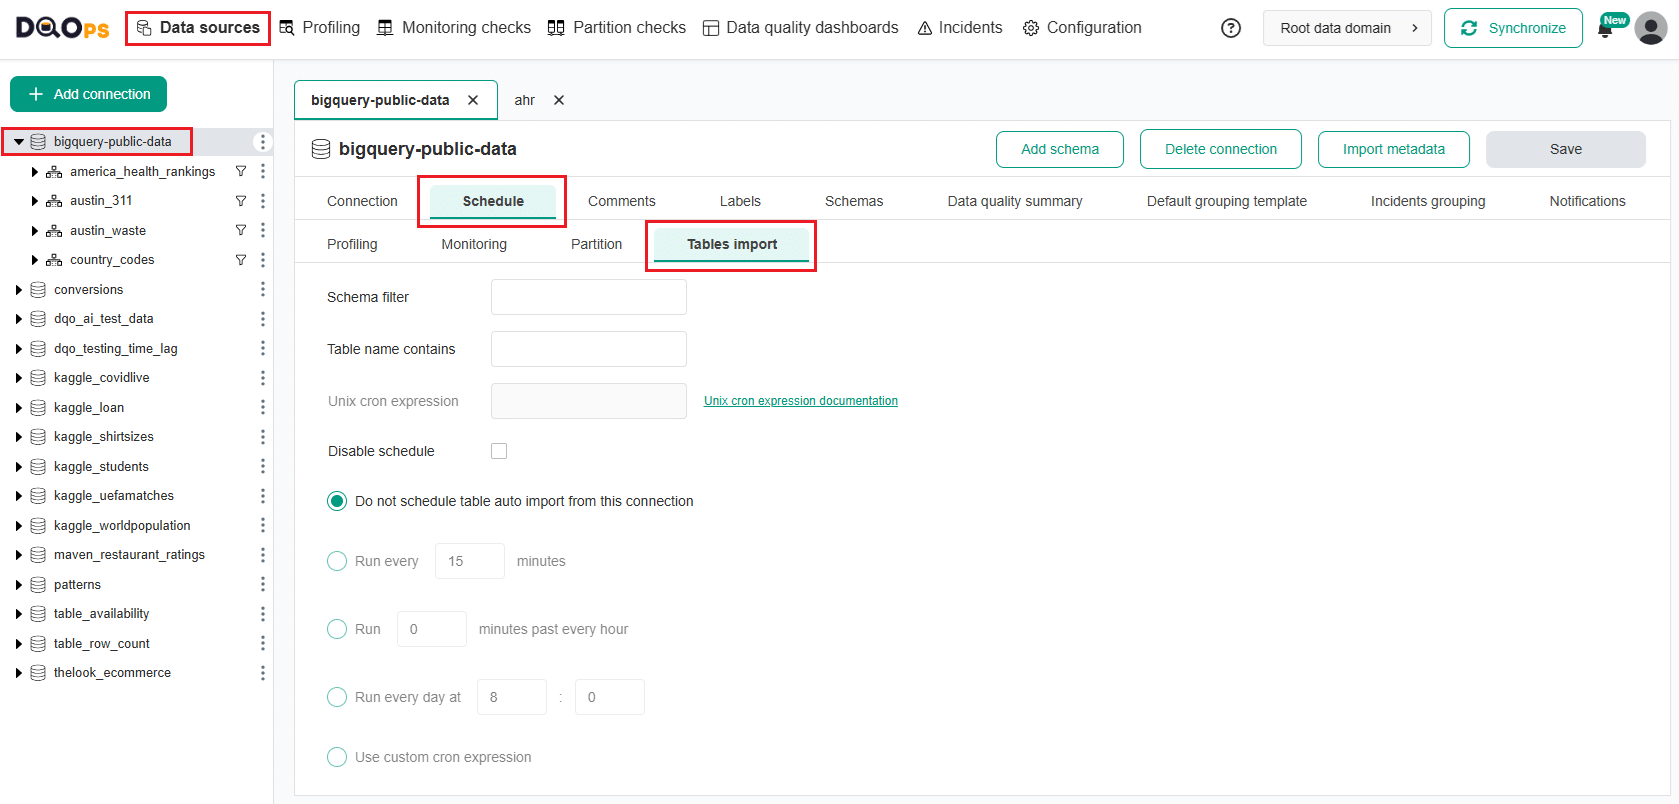
- Navigate to the Data sources section.
- Choose the connection where you want to set or modify the tables aout import schedule from the tree view on the left.
- Click on the Schedule tab.
- Select the Tables import tab.
- Define the import schedule using a Unix cron expression or choose one of the provided options. You can also add schema filters or specify the full name of the table, or use part of the table’s name.
- Click the Save button to confirm your changes.
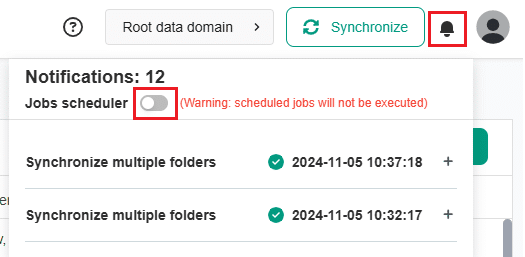
Start and stop a scheduler
In DQOps, the scheduler is started as a default.
To start or stop the scheduler use the user interface. Simply switch on or off the Jobs scheduler using the button in the Notifications window on the right upper right corner of the navigation bar.
To initiate a scheduler in the DQOps Shell, simply enter the command scheduler start. To stop the scheduler, use the
command scheduler stop. For further information on the scheduler commands, please refer to the Command-line interface section.
Scheduler can also be started in a server mode that continuously run a job scheduler and synchronize the data every 10 minutes. To do this, simply enter the command below in your terminal:
To terminate dqo running in the background, simply use the Ctrl+C.
For more information on the run command, please refer to the Command-line interface section.
Data synchronization scheduling
All the YAML configuration files with data source metadata and schedules configuration are stored in /sources folder.
You can read more about the data storage in DQOps here.
DQOps allows you to modify the frequency of data synchronization when the scheduler is run in a server mode
In order to configure how often the scheduler will synchronize the local copy of the metadata with DQOps Cloud and detect new schedules, start dqo with the following parameter:
Please use quotation marks when defining a frequency in cron format.
You can also configure this parameter by setting DQO_SCHEDULER_SCAN_METADATA_CRON_SCHEDULE=<Unix cron expression>
environment variable.
To modify whether the job scheduler will sync configuration files and results with DQOps Cloud, simply launch dqo with the following parameter:
To enable synchronization type true, to disable it type false.
You can also configure this parameter by setting DQO_SCHEDULER_ENABLE_CLOUD_SYNC=<TRUE/FALSE> environment variable.
What's next
- Learn how to configure CRON schedules for running data quality checks in YAML files.
- The format of expression and sample schedules are documented in the cron formatting reference.