Last updated: July 05, 2025
How to Register Data Sources in DQOps for Data Observability
Read this guide to understand how DQOps stores the connection parameters to monitored data sources, and how to manage credentials in a secure way.
Overview
This guide describes how DQOps stores the configuration of data sources in YAML files, and what configuration options are available.
Adding data sources from the user interface
If you are not interested in the details of the data source configuration, go back to the getting started section, and read the guide of adding a data source from the DQOps user interface, or consult the documentation of each data source, which also contains screenshots of configuration screens for each supported database.
Data sources configuration
DQOps stores the configuration of data sources in YAML files. The files support auto-completion in Visual Studio Code and can be versioned in Git.
For the purpose of this guide, we will assume that DQOps was started in the current folder using the python -m dqops command.
All files mentioned in this guide will be relative to the current folder, referred to as a $DQO_USER_HOME in the examples below.
DQOps YAML files structure
The structure of DQOps YAML configuration files is similar to the structure of Kubernetes specification files. Additionally, the first line references a YAML schema file that is used by Visual Studio Code for code completion, validation, and showing the documentation of checks. The concept of working with YAML files shows the editing experience in Visual Studio Code.
DQOps YAML file example
The following code example is a fragment of a DQOps data source configuration file, showing all regular elements of all DQOps YAML files.
- The YAML file schema identifier. Each type of DQOps configuration file points to its own YAML file schema. The YAML schema is used by text editors such as Visual Studio Code for the code completion and schema validation.
- The type of the file is identified in the
kindelement. - The
specconnection specification object that describes the data source, and its connection parameters.
The first line of DQOps configuration files has an optional link to a YAML schema file. The YAML schema files are used by text editors such as Visual Studio Code for code completion and schema validation.
The kind node identifies the type of DQOps file, and the spec node contains the specification, which is the real configuration.
For detailed file reference, consult the reference of the DQOps YAML files schema in the DQOps reference section.
YAML file extensions
DQOps identifies the type of its YAML files by the file extension. The file extensions of files storing the metadata of data sources are listed below.
| File name pattern | File purpose |
|---|---|
| connection.dqoconnection.yaml | Data source connection configuration file with the connection details and credentials. |
| *.dqotable.yaml | Monitored table configuration file with the configuration of enabled data quality checks. |
Data sources
The data sources can be registered in DQOps using the user interface or creating DQOps YAML .dqoconnection.yaml files directly in the data source folder.
Data sources folder
The configuration of data sources and the metadata of all tables are defined in the sources folder,
inside the DQOps user home folder, referred as $DQO_USER_HOME.
The example below shows two data sources named prod-landing-zone and prod-data-lake.
$DQO_USER_HOME
├───...
└───sources(1)
    ├───prod-landing-zone(2)
    │   ├───connection.dqoconnection.yaml(3)
    │   └───...
    ├───prod-data-lake
    │   ├───connection.dqoconnection.yaml
    │   └───...
    └─...
- The sources folder stores data sources as nested folders.
- Each folder inside the sources folder is a connection name to a data source.
- Each data source's folder contains a file connection.dqoconnection.yaml which specifies the connection parameters to the data source.
The name of each child folder inside the sources folder is a connection name to a data source. Each data source's folder contains one file named connection.dqoconnection.yaml, that specifies the connection parameters to that data source.
Configuring data sources in YAML files
The data source folder should contain exactly one file, that must be named connection.dqoconnection.yaml. An example data source connection file for PostgreSQL is shown below.
- The type of the file is identified in the
kindelement. Data sources use asourcekind. - The type of data sources. Use the documentation of the ConnectionSpec object
to find the names of other supported data sources, beyond the
postgresqlconnection type shown in this example. - The configuration node for PostgreSQL. Other supported data sources are configured in similar elements, named as the type of data source.
Each connection.dqoconnection.yaml must have two nodes filled:
provider_typeenumeration stores the type of the data source.- data_source_type node (
postgresqlin this example) stores the type-safe configuration for that data source, supporting code completion in Visual Studio Code.
The full documentation of the spec element is provided in the
ConnectionSpec object reference.
Examples of data source specific configurations are located in the data sources section of the documentation.
Configuring data sources from the user interface
Each type of data source has its own connection configuration screen in the DQOps user interface. Check out the data sources section to find the data source of interest, and learn the details of configuring your connections from the DQOps UI.
Using credentials and secrets
DQOps supports providing credentials from a separate location to avoid storing the connection.dqoconnection.yaml files in the source repository.
Referencing environment variables
Credentials are provided to a DQOps instance using environment variables.
Environment variables are referenced using as ${ENVIRONMENT_VARIABLE_NAME} values.
If you are running DQOps as a docker container, use the -e docker
parameter to pass additional environment variables.
Using shared credentials
Credentials and secrets that are shared with the DQOps Cloud (and DQOps SaaS instances) are stored in the .credentials folder. The name of the secret is the file name inside the .credentials folder. The following example shows two such secrets named my_postgress_user.txt and my_postgress_pass.
$DQO_USER_HOME
├───...
├───.gitignore(1)
└───.credentials(2)
    ├───my_postgress_user.txt(3)
    ├───my_postgress_pass
    └─...
- The default .gitignore file has a rule to ignore the .credentials folder and all files inside that folder.
- The hidden folder for shared credentials. This folder is added to the .gitignore, but is synchronized with DQOps Cloud if you want to use DQOps Cloud and synchronize the metadata between the SaaS environment and your local environment.
- The shared credentials are defined as files stored directly in the .credentials folder. The file name extension for credentials does not matter. This example uses a .txt file extension only for clarity.
The whole .credentials folder is added to the .gitignore, ensuring that the credentials are not pushed to the Git source code repository by mistake.
The following example shows how to reference the shared credentials using a ${credential://shared_secret_name} value.
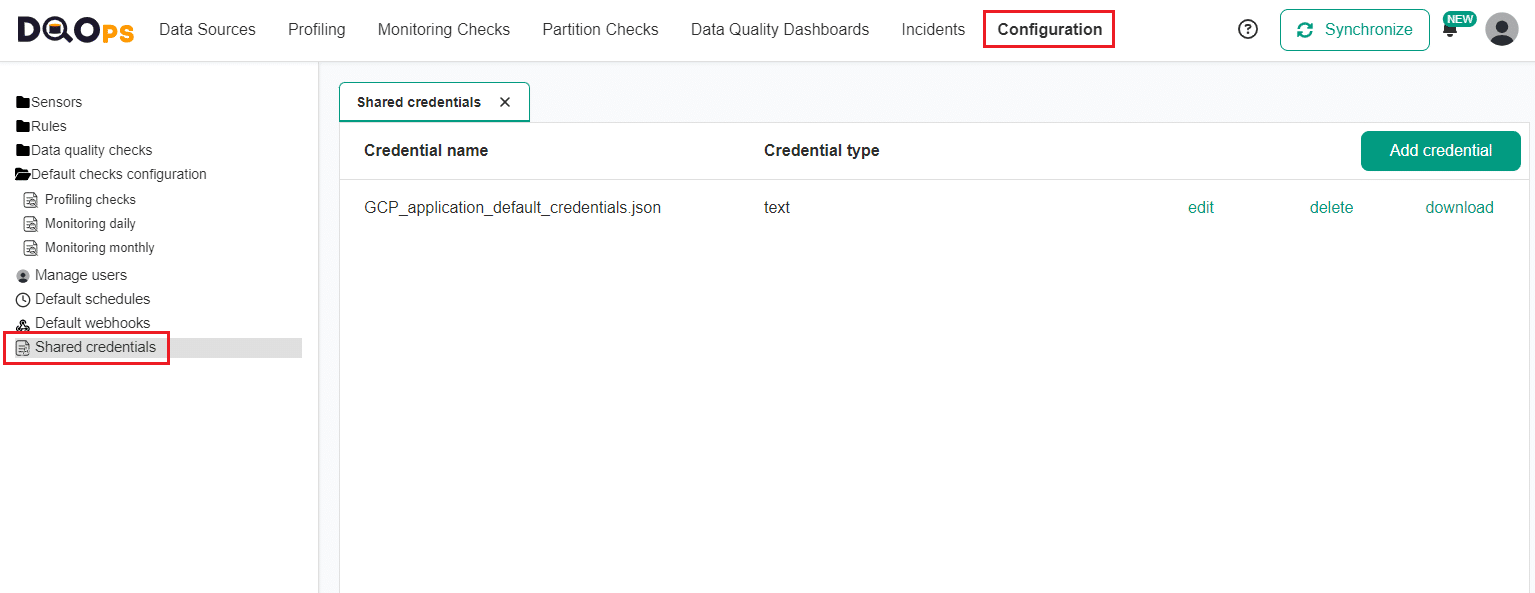
The shared credentials can be also edited in the Configuration section of the DQOps user interface by users holding an Admin or Editor role. Access management is enabled only in the TEAM and ENTERPRISE editions of DQOps.
Additional connection configuration
This section describes the remaining configuration parameters defined in the connection.dqoconnection.yaml file.
Job parallelism level
DQOps runs data quality checks in parallel, running checks for each table in a separate thread.
The limit of parallel jobs per data source is configured in the parallel_jobs_limit parameter.
- The configuration parameter for configuring the maximum number of tables that are analyzed in parallel.
DQOps license limits
The limit of parallel jobs supported by DQOps depends on the license level. Consult the DQOps pricing for details.
Data quality check scheduling
The DQOps CRON schedules for running each type of data quality check
is configured in the schedules section.
- The data source scheduling configuration of running data quality checks.
- The CRON schedule for running profiling checks.
- The CRON schedule for running daily monitoring checks.
- The CRON schedule for running monthly monitoring checks.
- The CRON schedule for running daily partition checks.
- The CRON schedule for running monthly partition checks.
When a new data source is added to DQOps, the configuration of CRON schedules is copied from the default schedules that are stored in the settings/defaultschedules.dqoschedules.yaml file. The schedules shown in the example above are used as the initial configuration.
-
profiling checks are run once a month, on the 1st day of the month at 12:00 PM.
-
all other types of data quality checks (monitoring checks, partition checks) are run every day at 12:00 PM.
Consult the data quality check scheduling manual to see how to configure data quality scheduling from the DQOps user interface.
The full documentation of the schedules element is provided in the
DefaultSchedulesSpec object reference.
Data quality issue to incident grouping
DQOps groups similar data quality issues into data quality incidents, the matching method is described in the data quality incidents article.
The following example shows where the configuration is stored in the connection.dqoconnection.yaml file.
- The
incident_groupingnode with the configuration of grouping data quality issues to incidents. - The data quality issue mapping method.
The full documentation of the incident_grouping element is provided in the
ConnectionIncidentGroupingSpec object reference.
Incident notification
When a new data quality incidents is detected, or a user changes the status of an incident, DQOps can send notifications. The notifications are sent by email or by calling a webhooks and sending a JSON IncidentNotificationMessage using a HTTP POST method. Multiple addresses can be provided, which must be separated by a comma.
This configuration overrides the default settings stored in the settings/defaultnotifications.dqonotifications.yaml file with data source specific configuration, allowing to send the notification to the data source owner or the right data engineering team.
- The incident notification settings node.
- The email address or a webhook url where DQOps sends notifications of new data quality incidents that were just detected. Supports both emails and webhook urls. Multiple target addresses should be separated by a comma.
- The email address or a webhook url where DQOps sends notifications of data quality incidents that were reviewed and assigned for resolution. Supports both emails and webhook urls. Multiple target addresses should be separated by a comma.
- The email address or a webhook url where DQOps sends notifications of data quality incidents that were resolved and the data quality checks can be run again to validate the fix. Supports both emails and webhook urls. Multiple target addresses should be separated by a comma.
- The email address or a webhook url where DQOps sends notifications of data quality incidents that were muted because the incident was identified as a low priority or out-of-scope. Supports both emails and webhook urls. Multiple target addresses should be separated by a comma.
The full documentation of the incident_grouping.incident_notification element is provided in the
IncidentNotificationSpec object reference.
What's next
- Learn how the table metadata is stored in DQOps.
- If you want to see how to import the metadata of data sources using DQOps user interface, go back to the getting started section, and read the adding data source connection again.
- Learn how to configure data quality checks and rules in the .dqotable.yaml files.
- Learn more about managing configuration in the
DQOps user homefolder. - Review the list of data sources supported by DQOps to find a step-by-step configuration manual for each data source.
- Learn what extensions are needed to activate editing DQOps configuration files in Visual Studio Code with code completion and validation.